
A well-organised account is essential for managing your product portfolio efficiently and ensuring the right team members have access to the right information. This guide will walk you through setting up and using the organisational hierarchy to structure your work, control permissions, and keep your product LCAs perfectly organised.
This structure allows you to mirror your company's internal organisation, whether by business unit, geography, or product category, making navigation intuitive for everyone.
Creating the Account Structure (global admins only)
Only users with the Global Admin role can create the top three levels of the hierarchy: Workspaces, Spaces, and Sub-spaces. This ensures your account structure remains consistent and is managed centrally.
Creating a Workspace
-
In the top right corner of your interface, click on the current workspace icon. A menu will open up. Select 'Company settings'.
-
Click the 'Add Workspace' button at the top right of the screen.
-
Enter a clear and descriptive name for your Workspace
-
Click 'Create'.
Editing an existing Space and/or Sub-space
Once you've created the first level of your organisation structure with all the required workspaces, navigate to the target workspace (step-by-step instructions) and manage its space/sub-space structure from there.
Whenever a workspace is created, a 'Default' space and 'Products' subspace are created. The first step in aligning with your internal hierarchy is to edit these defaults.
- Click on the menu icon (three-dots) next to the space or sub-space to see all available actions.
- For a space, you can add a sub-space, rename the selected subspace or delete it.
- For a subspace, you can delete if there is more than one subspace (one is required), or rename.

Creating a Space and a Subspace
To create a new space and subspace, all you have to do is:
- Click on the + sign under the 'Sold products' section of your left menu.

- A new modal will open up where you can specify the new space's name and create all the required subspaces. Simply click on 'Add subspace' to add a new one.

- Once you're happy with this structure, click on Save. Your new structure will appear on the left-hand side and the first sub-space will be opened by default.

Repeat these steps until you have built out the complete high-level structure for your organisation.
Organising Products into Folders
All users can create Folders to organise their day-to-day work. Folders are where your individual product LCAs are stored and must be created inside a Subspace. For even more detailed organisation, you can create sub-folders inside a folder. This nesting is supported up to five levels deep, allowing for highly specific project structures.
To create a Folder or Sub-folder:
-
Using the left-hand navigation panel, navigate to the specific Subspace (where you want to add your new folder. If you wish to create a sub-folder, access the folder by double clicking the folder name in the list until you reach the desired sub-folder. The path is displayed at the top to help you navigate back and forth

-
Click the 'New' button located at the top of the page and select 'Create folder'

- A modal will open up where you can specify the name of your folder.

-
After you click 'Save', the new folder will appear in your list under the 'Folders' section.

Adding Products to a Sub-space or Folder
Once your new sub-space or folder is created, it's ready to be populated with your product LCAs. You can add products in several ways, depending on whether you are starting from scratch, reusing existing work, or referencing centralised company data.
Here are the options available:
1. Creating a New Product
This is the most straightforward option for brand new work. You can create a new product LCA directly inside your new sub-space or folder, ensuring it's organised correctly from the start.
- Make sure you navigate inside the sub-space and/or folder where you wish to add your product.
-
From there, click the 'New' button in the top right corner.
-
Proceed with the creation process as normal.
For a complete walkthrough, please see our product creation guides
2. Duplicating a Product
This is useful when you're creating a product that is similar to an existing one. You can duplicate it and then make your modifications, saving significant time. It can also be used if you want the same reference product in your project folder.
-
When you duplicate an existing product, you will be asked to choose a destination for the new copy. Simply select your new sub-space or folder during this process.
For full instructions, read our guide on How to duplicate a product.
3. Moving Existing Products
If you have products already created elsewhere that you need to reorganise, you can move them into your new folder or subspace.
-
Navigate to the location of the product(s) you wish to move.
-
Select one or more products. You have multiple ways to do so:
-
Drag and drop. This will show you the number of products selected as you drag the selection across.

- Shift-selection.
-
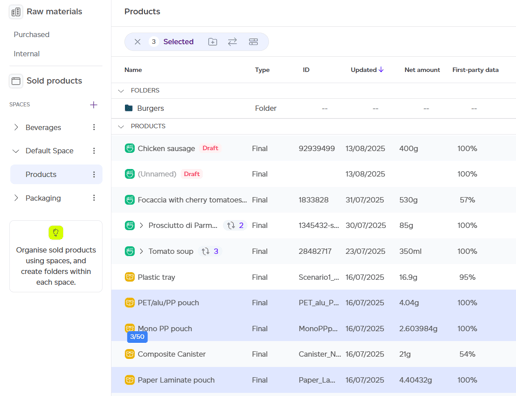
- Once selected, you can see the number of selected products as well as available actions at the top of the list. These actions are the same as in the product menu when only one product is selected (edit, model, history, delete etc.). When multiple products are selected you can:
-
- Create a new folder with selected products. This will create a folder in the current level you are in (ie. subspace or folder).
- Move products
- Compare products (if 5 or less products are selected)

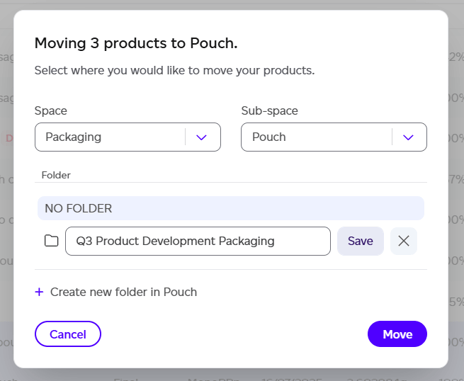
- If you click on the 'Move' icon a modal will open up where you can specify the space > sub-space > folder you want to move your product(s) into. By default, the 'no folder' option is selected if your product is just sitting in the sub-space. You can select an existing folder to move it into or create a folder/sub-folder from here.
-
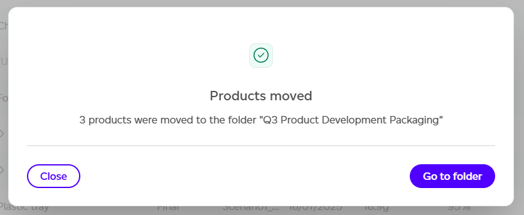
After you click on 'Move', you will receive confirmation of the move and will be given the choice to 'go to folder' (ie. the destination of your move) or close and stay in the original place where the products were.
4. Adding a Shortcut to a Raw Material (ie. Internal Product)
You may have some 'Internal Products' (e.g., common raw materials, packagings, or ingredients) that are re-used across many products. These global products live in a separate list, in the Raw Materials section of your interface, not within the organisational hierarchy created for 'Sold Products'. This is due to their global nature.
To facilitate your day-to-day work, you can add a shortcut to these items in your project folder. This avoids having to switch tabs and helps keep all relevant project components in one view.
-
Navigate to the Raw materials section of your account usign the left menu. Choose between Purchased or Internal depending on whether the product you want a shortcut for is made internally by your company or is a purchased good.

-
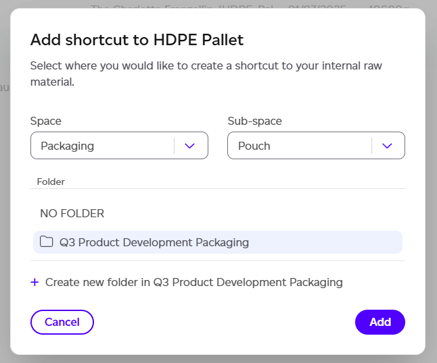
From the dropdown menu of the product you wish to add to your folder, select 'Add shortcut'

-
A modal will open up for you to select the destination of the shortcut. Find your project folder from this list and click on 'Add'.
-
You will receive confirmation of the shortcut creation and can choose to navigate to the destination folder where you will find your shortcut or stay inside the Raw Materials list.

A link to the internal product will now appear in your folder under the 'internal roduct shortcuts' section. It will be marked with a special shortcut icon to show that it is a link to a global item, not a product managed directly within your folder.

A number of actions are possible on your shortcut if you open the menu:
- Edit original, which will open the editor of the original internal product
- Details, to view the details of the original product
- Shortcut actions (do not affect the original product, only the link you created to it):
- Duplicate the shortcut (only one shortcut of the same product per folder is allowed)
- Move shortcut
- Delete shortcut

Examples & Best Practices
How you structure your account will depend on your company's organisation. The key is to use Workspaces as the highest level of division. Here are a few examples of how you can set up your hierarchy:
-
By Geography: Ideal for global companies where regional teams operate independently.
-
Workspace: Americas
-
Space: Canada
-
Sub-space: Frozen Vegetable Products
-
Folder: Green Peas
-
-
By Business Division: A perfect model for corporations with distinct business units.
-
-
Workspace: Consumer Packaged Goods
-
Space: Beverages
-
Sub-space: Carbonated Soft Drinks
-
Folder: Q3 New Product Development
-
- By Product Category: A straightforward approach if your portfolio is segmented into broad categories, with folders often representing brands or specific projects.
-
-
Workspace: Bakery
-
Space: Organic Breads
-
Sub-space: Sourdough Loaves
-
Folder: "Artisan Grains" Brand Launch
-